Privacy 101: Getting started with a Pi-hole
If you value your privacy, a Pi-Hole is a great addition to your network. It is basically an ad blocker for your entire network. A Pi-Hole will block ads and trackers for all network traffic, which also covers devices that generally don’t come with an ad blocker, such as your mobile phone, smart TV or other smart devices.
The installation of a Pi-Hole isn’t exactly plug and play and most tutorials on the web assume you know how to use a Raspberry Pi. I’ll try to start from the beginning and this should be doable with a bit of interest in computers. I won’t recite other tutorials, but I’ll share my notes and information to get you started in 10 steps.
1. Preparations
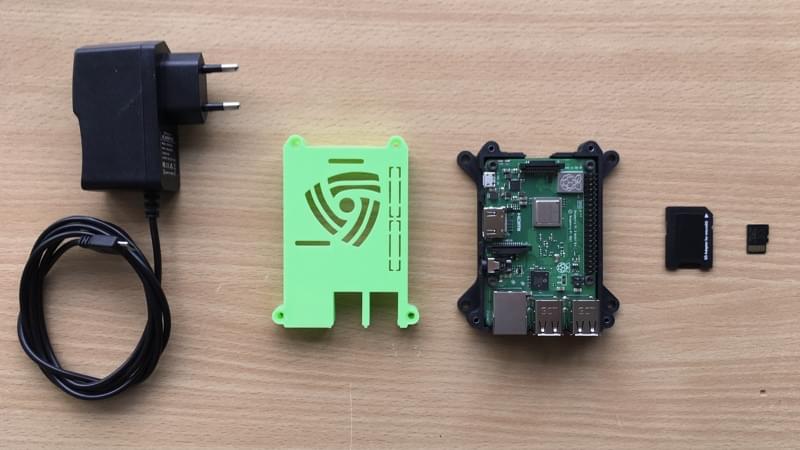
Shopping list:
- Raspberry Pi
- Raspberry Pi enclosure
- Micro USB charger (go for 5V/2A minimum)
- Micro SD card (SDHC class 6+)
- Ethernet cable
Tools needed:
- Micro SD card reader / adapter
- USB keyboard
- Some monitor/TV with an HDMI input
Information:
- Your router username/password
- (optional) Current DNS server IP address (check your router/modem settings)
2. Downloading Raspbian Lite
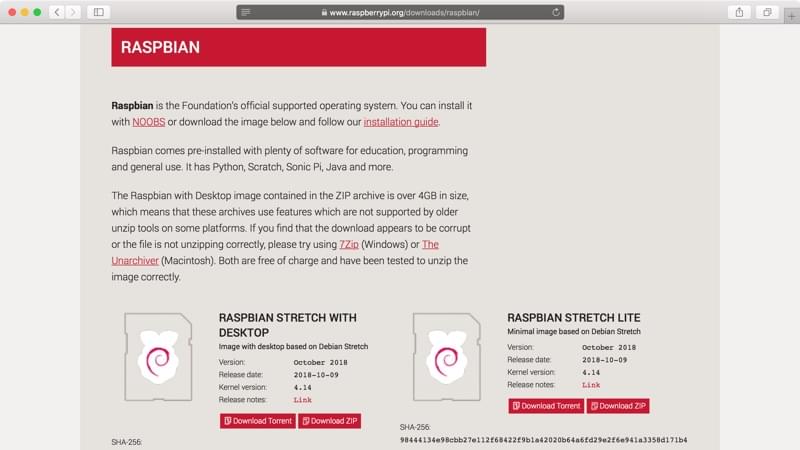
The Raspberry Pi will look for an operating system on the Micro SD card. Let’s put that on the SD card.
There are a number of options to choose from, including NOOBS and Raspbian. In this case we’ll go with Raspbian Lite. The main reason for choosing Raspbian Lite is that it doesn’t include stuff we don’t need, such as a desktop environment. This will result in faster operation and updates. The downside is that you will have to be comfortable using the command line.
You can download Raspbian Lite here:
https://www.raspberrypi.org/downloads/raspbian/
3. Preparing the SD card
Now to put Raspbian Lite on the Micro SD card. There are two options here:
- Use Etcher. This will work for Windows, MacOS and Linux.
- If you’re using MacOS, you can also follow my guide to creating bootable volumes on MacOS.
4. Logging in for the first time
Now put the Micro SD card in the Pi and connect your monitor, USB keyboard and lastly the power adapter. If your Micro SD card is prepared correctly, you should see something like this on your screen:
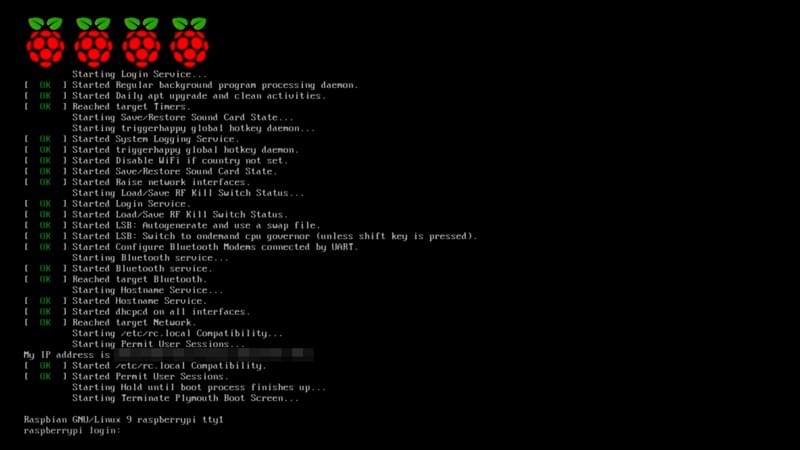
It wants you to type the default username and password. The default username & password are:
- login:
pi - password:
raspberry(it won’t show any characters while you’re typing)
Now, let’s set some essential settings by using this command:
sudo raspi-configYou will then see something like this:
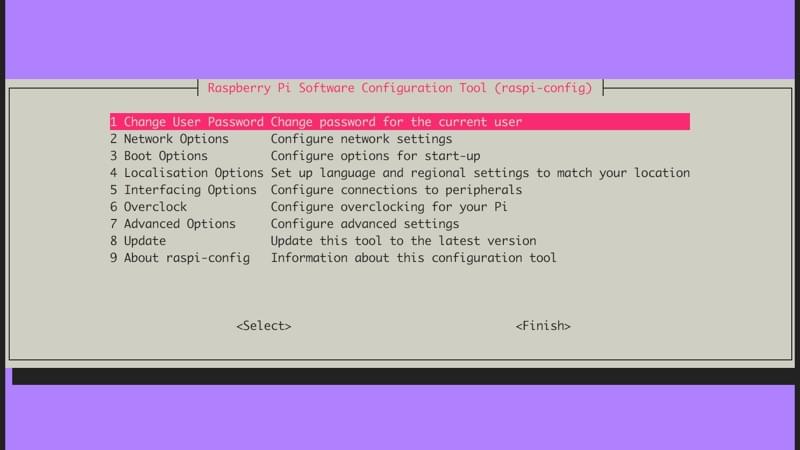
Essential settings to change:
- Choose option
1. Change User Passwordand make sure to use a strong password. Don’t forget this password, otherwise you might lock yourself out of your Raspberry Pi. - Choose option
5. Interfacing options>P2 SSH>Yes. This will setup SSH, so we can connect to the Raspberry Pi remotely.
Afterwards, run this command to make sure Raspbian (the operating system) is up to date:
sudo apt update && sudo apt dist-upgrade6. Connect the Pi to your router
Now you want stow away the Raspberry Pi where your router is located and connect to it remotely. You should be able to connect it using the following diagram:
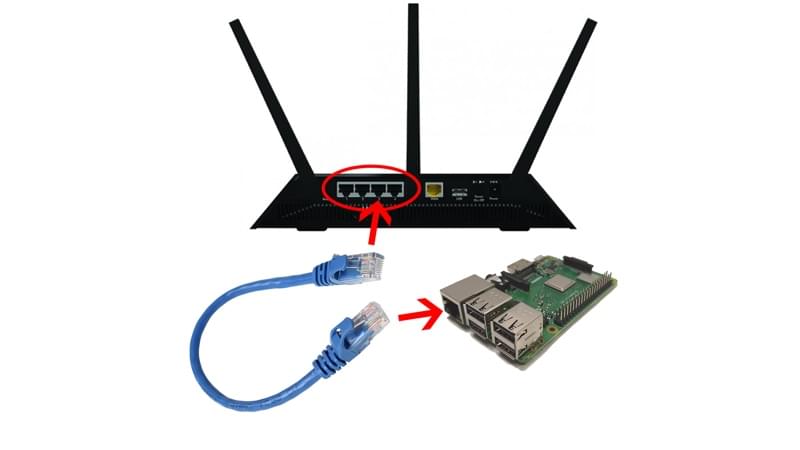
Don’t forget to connect the power adapter! If everything went okay, your router should now be able to see the Raspberry Pi on the network.
The next steps will vary depending on your router, but the settings naming conventions should be more or less the same.
First, log in to your router. Use a web browser and navigate to your router’s IP address, usually this is 192.168.1.1. Now log in.
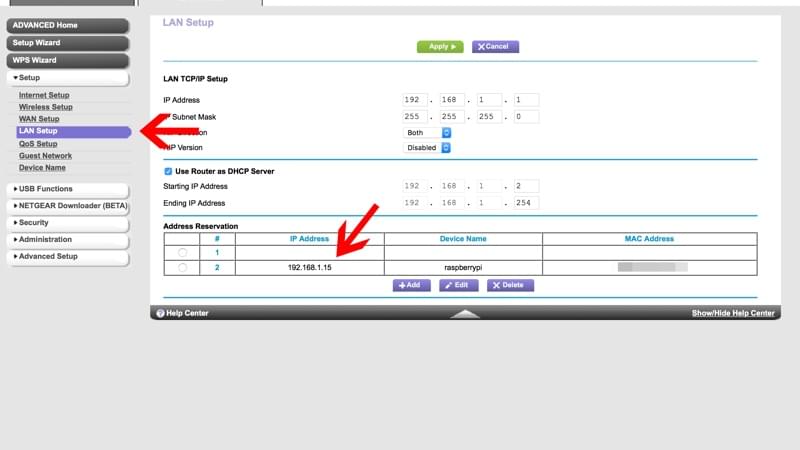
We have to determine the IP address of the Raspberry Pi on your network. Most routers will have a similar screen as shown below:

So in my case, the Raspberry Pi has IP address 192.168.1.15. Write this down so you don’t forget it.
We need to set this IP address to a static IP address. Usually this is found under some menu option called LAN setup and it might be under Advanced options. For my router it looks like this:
If you’ve done all of the above, you should be able to connect to the Raspberry Pi from another computer. Fire up a command line on your remote computer and try to connect to the Raspberry Pi by using it’s IP address:
ssh pi@[ip-address]If you’re getting errors because the ssh command does not exist, make sure you Enable SSH on Windows 10 or download the OpenSSH client.
7. Install Pi-hole
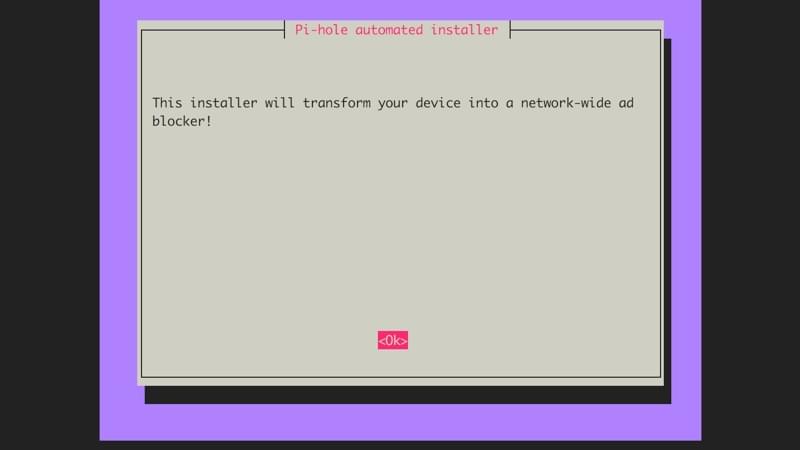
Assuming you can log in to your Raspberry Pi remotely, congratulations - this was the hardest part. Installing the Pi-Hole software should be a lot easier. Assuming you’re still remotely connected to the Raspberry Pi, run this command:
curl -sSL https://install.pi-hole.net | bashThis should open the installer:
Now follow the installer steps, be careful with these steps:
- Yes, you want the web interface to be installed.
- If you value your privacy, you might not want to use Google or Cloudflare DNS. You can use a custom DNS server, such as the one from your Internet Service Provider (ISP). This information can be found in your modem settings and/or router settings.
- Make sure to confirm your Raspberry Pi uses a static IP address.
After the installer completes, we’re nearly done!
One thing you want to do right away, is set your own password for the Pi Hole interface using this command:
pihole -a -p8. Setup the Pi-Hole as your DNS server
OK so now the Pi-Hole is installed and running on your network. The next step is to route your network traffic through the Pi-Hole. This is done by setting it as a DNS server.
Again: the next steps may be different for your router, but will look similar.
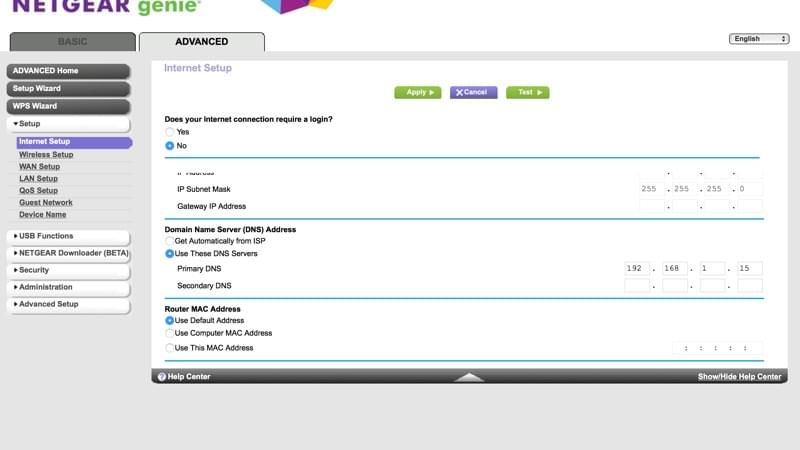
- Connect to your router like you did in step 6.
- Set the DNS server to the Pi-Hole IP address. Usually you can find this setting under the
InternetorDHCPoptions.
This is what it looks like on my router:
9. Testing the Pi-hole
Now, if you’ve set the Pi-Hole as your DNS server and your internet connection is still working, this is good news! But how do you know if the Pi-Hole is blocking anything?
Well, we’ve enabled the Pi-Hole web interface for a reason! You can check it out by visiting the Pi-Hole’s IP address using your browser:
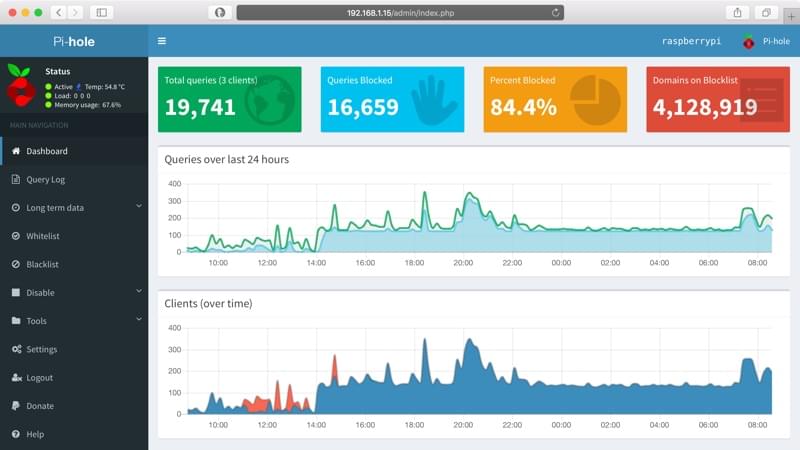
You can log in using the password you’ve set in step 7. Here you can see what has been blocked, update your block lists and do all kind of maintenance tasks. I will not review this in detail, since it’s mostly self-explanatory and well-covered by the Pi-Hole community.
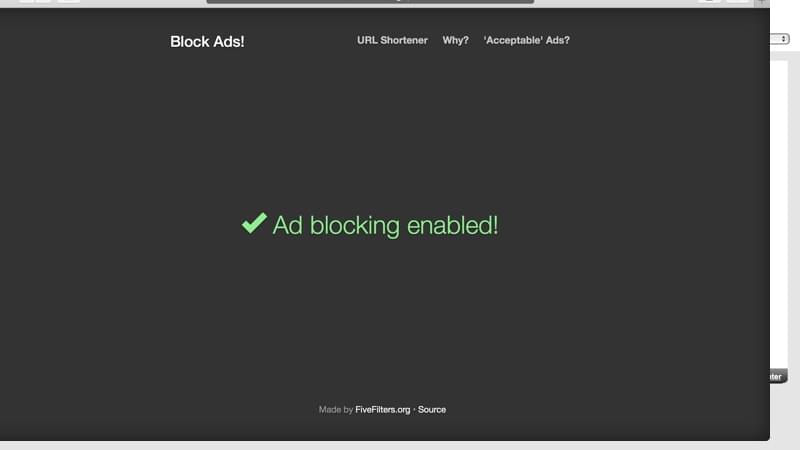
Apart from that, the Pi-Hole website has a nice collection of test websites to see if your Pi-Hole’s blocklists are functioning correctly.
10. Put the Pi-Hole in an enclosure
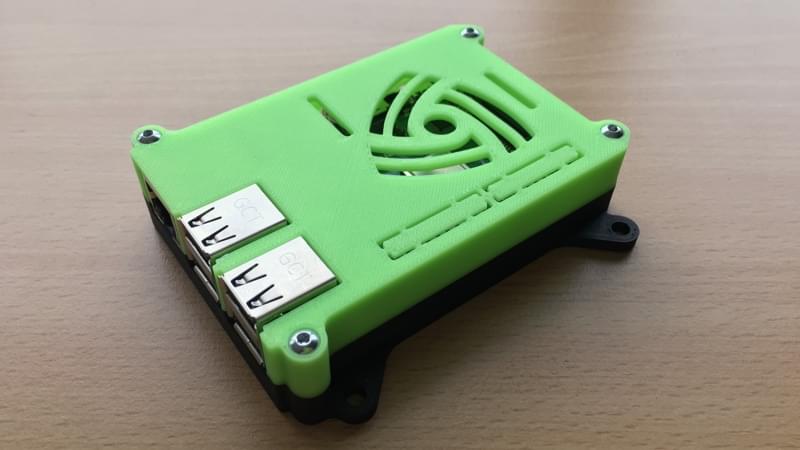
A ‘naked’ Raspberry Pi can be damaged easily. If everything is working correctly, I suggest you put it in an enclosure to finish the job. I’ve put mine in a 3D printed enclosure (source).
Bonus: Improving the blocklists
The default settings of the Pi-Hole are not likely to break anything, but also offer limited protection against ads and trackers. Leave it running like that for a week and see how it works for you.
If you’re ready for some enhanced protection, keep in mind that this might break some websites known for their tracking (Google, Facebook, LinkedIn, …). A good source to start with some more elaborate blocklists is The Firebog.
Bonus: Utilising the Pi-hole while using a VPN
I found that by default, my VPN will use a different DNS server regardless of the router settings. This can be modified by adding this to your OpenVPN config:
dhcp-option DNS [pi-hole-ip-address-here]Next step: improving security
Please keep in mind that the Pi-Hole runs at the center of your network and it will need some maintenance and security checks. Take this seriously or you’re putting yourself at risk of a man-in-the-middle attack. A good place to start improving the security is this guide in the Raspberry Pi documentation.
For setting up UFW (or any other firewall), make sure to set these rules:
- allow port 22 (ssh)
- allow port 80 (http)
- allow port 443 (when using https)
- allow port 53 (dns)
Good luck!